自分のサーバorレンタルサーバでWordpressをマルチサイトで運営している場合、他者へ使い方を伝えるのは難しい。
そこで簡単に投稿できるツールはないかと探してみた。見つけたのがこれ、WriteToMyBlog。
http://writetomyblog.com/
一番基本的な使い方を紹介します。
If you use WordPress Multisite on your server or rental server, it is so difficult to teach anybody about how to use wordpress.
So, I searched a tool which can post to wordpress more easily.
and I found ‘WriteToMyBlog’.
http://writetomyblog.com/
I write how to fundamental use ‘WriteToMyBlog’.
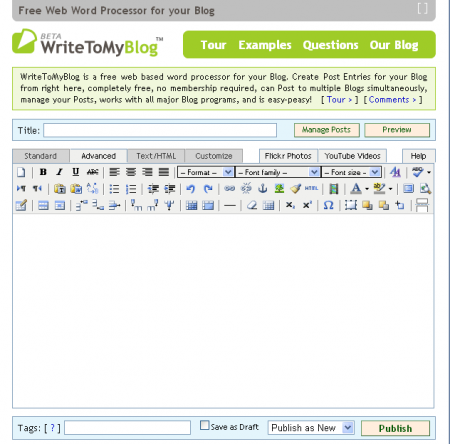
タイトルと記事を入力(Input ‘Title’ and an article)
| タイトル(Title) | 投稿する記事のタイトル(input a title of post) |
| 本文(text) | 投稿する記事の内容(input an article) |
上記入力後、「Publish」ボタンを押す。
そうするとポップアップウィンドウが開きます。
after input a title and an article, push the button ‘Publish’.
so, open a new window automatically.
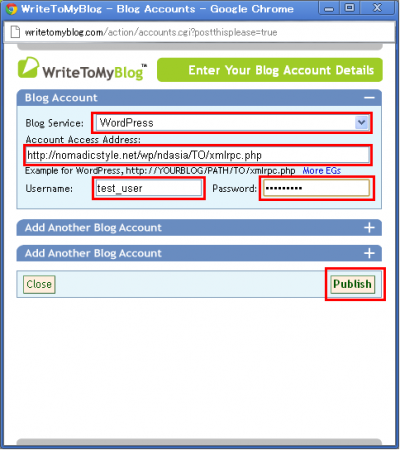
ブログサービスの選択(Select ‘Blog Service’)
| Blog Service | WordPress |
| Account Access Address | http://{YOURBLOG}/{PATH}/TO/xmlrpc.php(example)
http://nomadicstyle.net/wp/ndasia/TO/xmlrpc.php ブログのトップページのURL+’TO/xmlrpc.php’ |
| Username | ユーザー名(your username) |
| Password | パスワード(your password) |
上記入力後、「Publish」ボタンを押す。
After input all, push the button ‘Publish’.
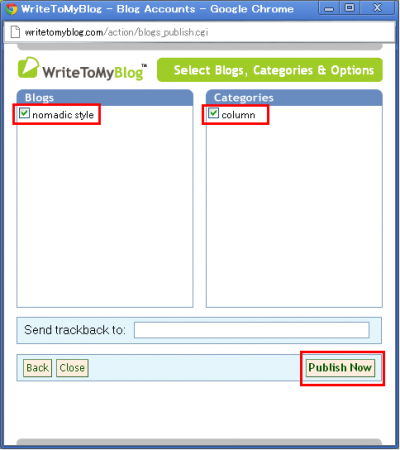
ブログ名とカテゴリーの選択(Select your blog and category)
| Blogs | ブログ名を選択(select your blog’ name) ※マルチサイトで運用していても、現時点では親ブログ名しか出てこないようです。 Notes: If you use WordPress Multisite or not, it shows only main blog’s name. |
| Categories | カテゴリーを選択(select your categories) ※任意(optional) |
上記選択後、「Publish」ボタンを押す。
After select your blog’s name and categories, push the button ‘Publish’.
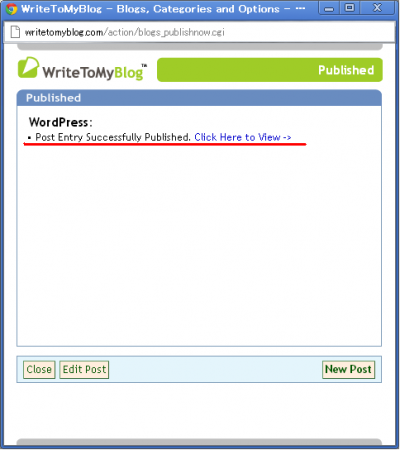
投稿に成功すると、上記メッセージが表示されます。投稿結果を確認したい場合、「Click Here to View ->」をクリックします。
※この時点でエラーが出る場合、 xmlrpcでの投稿が出来ない設定(デフォルト)になっています。管理者権限のあるユーザでログインし、「設定」→「投稿設定」→リモート投稿欄の「XML-RPC」にチェックを入れてください。
If it shows the message ‘Post Entry Successfully Published.’ in a window, your post is successful !!
and if you want to confirm your post, click the message ‘Click Here to View ->’.
Notes:
If it shows the error message, you don’t set remote publishing on your blog.
Log on by administrator, ‘Setting’->’Writing’->’Remote Publishing’->check ‘XML-RPC’.
And try again.


![[シンガポール探訪記] Day3-5 らーめんチャンピオン](http://nomadicstyle.net/wp/ndasia/files/2015/11/DSCF0281_1_convert_20121124224413-150x150.jpg)
![[シンガポール探訪記] Day2-6 クラークキー再び](http://nomadicstyle.net/wp/ndasia/files/2012/11/a_convert_20121113234825-150x150.jpg)
![[シンガポール探訪記] Day4-2 リッツカールトン ミレニア シンガポール](http://nomadicstyle.net/wp/ndasia/files/2012/12/DSCF0445_1_convert_20121202235140-150x150.jpg)
![[シンガポール探訪記] Day3-1 スタバ](http://nomadicstyle.net/wp/ndasia/files/2012/11/DSCF0122_1_convert_20121115020403-150x150.jpg)


![[シンガポール探訪記] Day5-6 ラオ・パ・サ・フェスティバル・マーケット (ホーカー)](http://nomadicstyle.net/wp/ndasia/files/2012/12/DSCF1158_1.jpg)
![[台湾探訪記] 台北車站](http://nomadicstyle.net/wp/ndasia/files/2013/01/DSCF1248_1.jpg)
![[シンガポール探訪記] Day5-4 シンガポール ホーカー 「マックスウェル・フードセンター」](http://nomadicstyle.net/wp/ndasia/files/2012/12/DSCF0736_1.jpg)
![[シンガポール探訪記] Day5-9 シンガポール ウォーターフロント 夜景](http://nomadicstyle.net/wp/ndasia/files/2012/12/DSCF0847_1.jpg)
![[台湾探訪記] 台湾 鼎泰豐 (ディンタイフォン) 本店](http://nomadicstyle.net/wp/ndasia/files/2013/01/DSCF1289_1.jpg)

![[シンガポール探訪記] Day3-2 散策: クラブストリート](http://nomadicstyle.net/wp/ndasia/files/2012/11/DSCF0222_1_convert_20121116002802.jpg)
![[国内探訪] 平泉 高館義経堂](http://nomadicstyle.net/wp/ndasia/files/2013/03/DSCF1520_1.jpg)
![[シンガポール探訪記] Day1-4 オフィス?](http://nomadicstyle.net/wp/ndasia/files/2012/10/DSCF0122_1.jpg)
![[国内探訪] 平泉 毛越寺](http://nomadicstyle.net/wp/ndasia/files/2013/03/DSCF1472_1.jpg)